BREAD BAKING
TIPS - Elusive Oven Shoot or Oven Spring

Oven shoot or oven spring is elusive. It's part of the craft of bread baking.
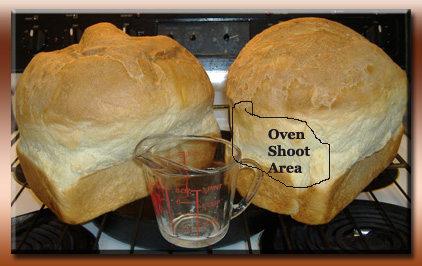
Look at the picture to the left. It is a good example of oven spring, also known
as oven shoot. I put a one cup measuring cup in the picture to give you some
perspective on the size of the loaves. Both loaves have good oven shoot.
They are two pound loaves. I made the dough in my bread machines. They were
baked for 22 minutes at 375 degrees in my home oven. These loaves are light and
make good sandwich bread. My kids love white bread. It's great for peanut butter and
jelly sandwiches. I like white bread for simple Swiss cheese and mustard sandwiches.
Every once in while you will notice your loaves seem to magically shoot up while
baking. Why? It's not magic at all. It's part of the craft which you will only
learn with practice. There is an optimum time to put your loaves in the oven. The
yeast needs to be in its most active stage to get oven shoot. It has to be on the up
swing. If you let your dough sit and rise, you will see it rise vigorously to a point and
then the rising slows. The activity of the yeast will increase to a point and then become
less active. To get oven shoot you need to bake your loaf when the yeast is
on the up swing. You will only learn how to get oven shoot over time. Just being
aware of oven shoot or oven spring is a start. Make a mental note the next time
one of your loaves turns out like the ones pictured. I found that it helped me
to keep a log while learning bread baking. I had a spiral notebook and recorded
my bread baking experiments. That's part of the scientific method used in
laboratories and in industry.
I can get
oven shoot consistently because I monitor the temperature of my bread baking
through out the process. Home bread baking is all about temperature. To make the
loaves pictured, I first made a sponge. I took equal parts warm
water and flour and some yeast. Mixed them together and let them sit for an hour
before adding my sponge to my bread machines. I substituted equal parts water and
flour for sponge in my recipe. My dough was really active at the end of my first
rise when I put my loaves in the oven. I did not bother with a second rising at
all. My loaves were in the oven after a mixing period of about 30 minutes and a
first rise of about 30 minutes. Remember it's a craft. There are no absolutes.
Think about it. No second rising to get these beautiful loaves and I did not
knead by hand. My bread machines did all the work. I just get the credit.
These loaves are white bread which is not fashionable today. The flour is bread
flour. Bread flour is high protein, unbleached and fresh. It's fresh because I
buy a commercial product in 50 pound bags. I use olive oil and honey. No milk or
eggs. No animal products. When you make your own bread you decide what
ingredients to use. Next time you make a loaf compare it with the picture. Learn
the basics of bread baking and build your skills from there to become an artisan
bread baker. Learn right from the start. There are no short cuts to becoming an
artisan baker.
Or maybe you want to learn how to master sourdough Video Sourdough.
More Tips
at the following links:
© Copyright
1990-2021
Video Bread
videobread@gmail.com
Better bread baking starts
with Video Bread. The recipe for success!


